Photos


Related

Jan 3 Caramel
- 2 cups granulated sugar
- 1 3/4 cups white corn syrup
- 1/2 pound (two sticks) butter
- 2 cups heavy whipping cream, divided
- generous 1/2 teaspoon kosher salt
- 1 teaspoon vanilla extract
The past few years I've been in the habit of making both caramel and peanut brittle at Christmas time and including it along with some of my gifts. One of the neat things about these candies is that the recipe for each of them comes from a different great-aunt of mine. They were treats I ate growing up around the holidays, either because they made them or my mother made them. So, it's fun to continue the tradition a little bit.
For the caramel, I put the granulated sugar, syrup, butter, and 1 cup of the cream on medium heat, stirring just to dissolve the sugar. Once the mixture had come to a boil, I turned the heat down low enough just to keep it at a slow boil. I then boiled it for 45 minutes, periodically using a pastry brush to wash the sides of the pot down with water. The idea in candy making is to prevent sugar crystals from forming on the sides, as that can cause the entire batch of candy to crystalize or "sugar".
After the 45 minutes had passed, I mixed together the salt, vanilla, and remaining cup of cream. I slowly poured the cream into the pot. I then continued to slowly boil the mixture until it read about 250° on a candy thermometer, testing near the end to make sure a "firm ball" stage had been reached. I tested it by dropping a spoonful of the mixture into a glass of cold water, then gathering up the candy from the water with my fingers. Once a "firm ball" stage is reached, a ball can easily be formed with the candy that will hold its shape at room temperature but which is still somewhat pliable.
At that point I poured the carmel into a 10" x 15" jelly roll pan lined with lightly buttered aluminum foil and let it cool to room temperature.
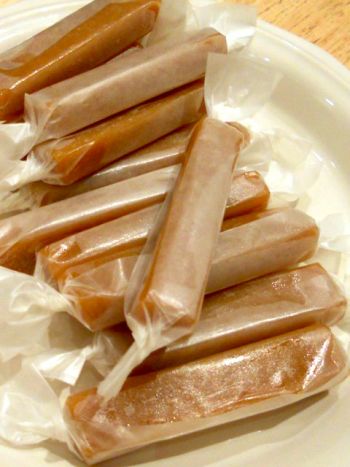
Of course, since I was giving this as a gift, part of that gift is presenting it in a nice package. In the past I've cut the caramel into one inch squares and wrapped each piece individually in colored foil. The foil is a bit tedious to work with, so I was hoping for something a little easier this year. Since I was giving several jams as gifts as well, I was planning on coordinating my food gifts in matching mason jars. I wanted something that would work well inside of a jar. I wound up cutting the caramel in 1/2" x 2 1/2" strips and wrapping it in waxed paper with twists at each end. That was much easier to do, and I think it looked nice in the jar.
To finish the whole thing off, I created labels for all of the jars. The labeling was really an entire project in its own right. I wanted something that would give a finished look to it all, but that would contribute to the handcrafted feel of the mason jars. I decided on brown kraft paper for the actual labels. I wanted handwritten names for the contents, but I didn't trust myself to be able to write it out consistently for several dozen jars. So, I used a black permanent marker on white paper to write each item out. I then scanned that, combined the handwritten name with typed ingredients and the date in Illustrator, and printed it out on the kraft paper, which I had trimmed into several 8 1/2" x 11" sheets. I then used a paper trimmer to neatly trim each label to the right size and used rubber cement to adhere each label to a jar. It was definitely a bit of work, but I was very pleased with the results. I really like the feel the kraft paper gave to the finished product.